Friday, February 25, 2011

New Sparklies, and the Old - Secondhand Treasures

I love Goodwill. (And for clarification, "Goodwill" is like Splenda is like Kleenex, I use it for all secondhand/thrift stores that aren't fancy-schmancy boutiques - not that I go to those places.  But anyway.)  When I was a teenager, back before there was a real internet or such a thing as Hot Topic, we went to Goodwills and Army/Navies to find clothes and accessories.  I can't tell you how much I wish I knew how to use a sewing machine back then!

I love antique stores, too, though I find Antiquing to be more of a Blood Sport, and the stores themselves to be overwhelming.  I'm great in the first hour, bu after that I pfffft out.  (The last time I antiqued, the store already knew about the flour sack trend, so that was useless.) But I do like buying buttons and costume jewelry at these places.

One thing that I think it is pretty pointless to buy new, unless you absolutely love it, is kitchenware.  We having mixing bowls from IKEA, because I fell in love, but I would have done just as well going to Goodwill.  Glasses, serving trays, plates, teacups, mugs, silverware - no reason to pay full price.  It's already been fully established that these things don't need to match, and I've found that if you get things you love, they tend to go together, anyway.

So here are some recent aquisitions from Goodwill:

Wishbones or Antennae?

I find that I always need mid-sized glasses, as they tend to meet an early death.  I loved these because they are totally simple except the very mysterious insignia thereupon.  I really thought they were wishbones at first, which made me think why? Where did these come from?  There's no mark on the bottom of the glass, so who knows what the purpose is.  Then they kind of looked like butterfly antenna, which is even more baffling.

I'd be happy to hear any theories as to why these glasses exist, and what they mean.  I'm willing to humor any crazy theory, really.

The glasses in this photo are in front of one of my favorite things I've found at Goodwill:

I think it is actually a letter holder, but I use it as a napkin holder.  One buck for porcelain that you will never see in anyone else's house, ever.  So what if it looks, um, sideways a little.

I also have this theory that you should use your wedding or nice china if you have it.  Admit it - it's not HRH Royal China or a Presidential Dining Set, it's stuff you liked enough to beg your family and friends for, and it's probably replaceable if for some mysterious reason you DO need that 8th dessert plate.  I drink my coffee, every day, out of a cup & saucer, and even my Goodwill finds match.  Here's a cup & saucer from different sets (neither is my wedding china) living together in harmony:
The saucer is a vintage Mikasa that was part of a set that I picked up for ten bucks, but inexplicably it came with 20 saucers and no cups.  You can't even find the cups online! 
These are easily the most beautiful cups I've found at a Goodwill, so these break my I Wouldn't Cry if They Broke rule and therefore live in the Pie Safe.  I'm thinking about buying up more cups and saucers as part of my soon to start etsy venture.  More on that later!

This my final find from the last trip to Goodwill.  Lamp bases are either ugly or too expensive, andI had looked everywhere for a lamp base for the Artifact Room aka the Second Bedroom, and we found this beauty of a crystal base for a song at Goodwill!


Isn't it gorgeous?  I couldn't be happier.  The side table is one some of you may remember from several years ago from Urban Outfitters, and the cinnamon roll candle is from a local artist here in MN.

I was going to go into my favorite stuff from Valentines Day, but this entry is long enough on its own, so that and my newly completed scarf will have to wait.  I'll leave you with Scrabble enjoying her favorite home made toy!

Scabble tells the toy not to give her any of that crap

Monday, February 21, 2011

Tutorial: Optimizing Miniature Upholstery Using Fusible Web

Magpie Shinies readers will remember that a few months ago I shared some of the fabrics that were going to become upholstery and other soft furnishings in the inch-to-the-foot scale Georgian Manor House which is the craft project looming largest in my life right now.

Well, with what we'll call a "budgetary lull" preventing me from doing any big things like flooring or lighting for a while, I thought I'd finally break out some of those old House Of Miniatures kits that I'm reworking for the bulk of the remaining furnishings. At pennies on the dollar they'll allow me to furnish the house in the style it deserves, but on the cheap compared to store-bought new miniatures for All. Those. Rooms.

In the process I discovered a terrific approach that I thought merited a tutorial, since it's a technique that I think has many potential uses beyond building miniature furniture.

A little history: House Of Miniatures, and indeed dollhouse miniatures as a hobby, peaked in the late 1970s and early 1980s. They had a full line of furniture kits from simple nightstands and tables to elaborate hutches and fully upholstered chairs.


You'll remember I declared that I was going to replace their default fabrics with some beautiful bits of silk I'd acquired, as indeed I did with my first upholstery effort, this Chippendale wing chair.


Because, there's no comparison between those results and what it would have looked like had I gone with the plain, drab blue cotton that came with every kit.


The project I'll document is the complementary Chippendale sofa. The first step is to press the fabric thoroughly with your steam iron.


Next, I'll apply fusible web - such as Heat-N-Bond - to the reverse of the silk.


In this case I started with one section, but ended up having to apply fusible to the whole length in order to meet the "seam allowances" for everything required. Be sure to set your iron to DRY for this process.


When cooled, peel away the paper backing and you'll see where your web, just like the wrong side of fusible interfacing, is ready to attach your fabric to whatever you need.

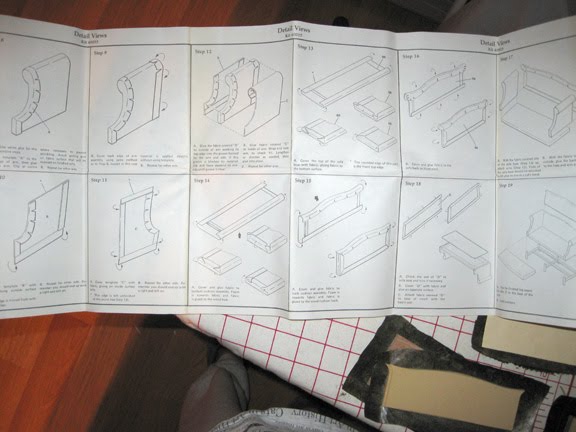
Next, I consult the part layout provided in the instructions and identify all my pieces, both the wooden structures and the cardstock cutouts that make short work of some of the more delicate bits.


The kits requiring upholstery include foam for the cushions, usually glued to a wooden base. In cases where the contents seem to have deteriorated too far to be reliable - remember, most of these kits are 30+ years old already, probably stashed forgotten in someone's attic until rescued and popped on eBay - I re-cut new foam from materials you can find at any Michael's or similar craft supply, but since these look well-preserved I'll go ahead and apply them as instructed. I do add another step of my own before I actually cover them...but I'm getting ahead of myself.


Now I take all my pieces that require covering with fabric and lay them out on the fabric + fusible web length, identifying the optimal position for each to economize on the fabric but still ensure I have enough allowance for the wrap-arounds required.


The next step is to cut them all out. In the instructions it will tell you to glue the cardstock templates, specifically, to the fabric. This is one of the steps that the magic of fusible web allows me to avoid for everything but the smallest pieces like the front of the sofa's roll-arms, to which I apply just the tiniest dab of glue to hold the template in place for cutting.


Now, cutouts complete - to the instructions! Back in the 80s, this would all be about the glue, glue, glue: apply the fabric templates to the parts, clip curves where you need to, and then find some kind of creative way to hold it down and WAIT FOR IT TO DRY. It would take forever...probably why the only kits I ever constructed before this were all wood and no upholstery. Contrary to popular opinion, I'm not very patient at all.


But it's 2011, and I have fusible web on my fabric. I knew, from past experience making fabric-covered puzzle boxes, that it could easily and tidily bond fabric to cardboard. So, I thought it stood to reason...why not to lightweight wood?

Job one is to break out my hand-held craft iron. You can't do close work like this with a full-sized iron, but a craft iron like this one from Clover - essentially a flat-paddled soldering iron with an adjustable temperature control - is perfect for this scale of project. Two important caveats for a tool like this: one, be sure to use the supplied stand to rest it on when not in use, or it will burn through your ironing board cover just as surely as your full-sized iron would; and, two, be very careful of your fingers whenever you need to hold down bits of fabric as you apply the iron for fusing.


I'll start with the fiddliest bit: the tops of the roll arms. A little glue attaches the lightly pre-glued template + fabric to the arm, and I hold it precisely in position.


Starting in the middle of the curve, I fuse the clipped edges to each side of the arm to hold them more or less in place while I continue the fusing process. In general I've found it works best to fuse the clipped curves first, before the straighter edges. It works brilliantly....and the best part is, I don't have to go and do something else for a few hours while waiting for glue to dry! Once the fabric and wood cool - a matter of moments - I can continue working with the same piece and move on to the next step. (Apologies for the blurry photo.)


The back of the arm is even easier. I can fuse the template - all fabric + web, no cardstock - directly to the wooden element before I start on the curves! No muss, no fuss, and wonderfully clean results, with sharp lines and no bleed-through from using too much glue.


For the larger cardstock templates, I begin by using the hand iron to fuse the fabric thoroughly to the cardstock, fabric side up. Be sure to do this right in the center of the template and leave the edges for later, or you'll risk fusing your piece to your ironing board.


When it's time to fuse the foam-covered "cushions," I want them to be a little less spartan than the original, so I add one layer - only one! - of lightweight quilt batting. I find this gives me the "cushier" look I want without adding so much bulk that the components, which really are very precise, no longer fit together well.


After a couple of hours' work, all the components have been fully fused and are ready for assembly - a much quicker, simpler and more precise job than it would have been back in a glue-based world.


And at the end of my evening's project, all that remains for the next day is to finish the legs and glue the upholstered sofa to the base.


A few general hints for working with fusible web, if you haven't before:
  • Sometimes, especially when you're adhering fabric to another bit of fabric that's already been folded over and fused, the bond doesn't want to immediately "take." Apply some pressure to the desired point with your fingertips until the fabric cools a bit, and the bond will usually hold.
  • For cardstock templates, pre-clip to the edge of the cardstock for your curves. When working on wooden assembly pieces, first fuse your fabric to the wood, and then clip as you go.
  • Keep any extra bits. You may have dining chairs or benches you want to upholster to match, later on - I know I do!
  • Don't put the craft iron away when you're done with a project like this. They're very handy when you want to achieve a really precise point on a collar or a cuff.
I've been busy with soft furnishings for the Manor, too - next time, I'll share with you some of my results in a non-tutorial gallery!

Friday, February 18, 2011

Wonderful Gifts

by Kimberlee

(And I'm annoyed that I still haven't found the cord that allows me to upload photos into the computer.)

To be honest, I was sort of not looking forward to Valentine's Day, just a little. Don't get me wrong, I LOVE V-day, despite my tendency to be a cynic, but I had chemo scheduled for that day, so I was feeling pretty sorry for myself.  It generally stresses me out to go out to dinner on V-day evening (too busy), and I had felt too punked to go out the night before.  So yeah, I was feeling pretty sorry for myself.  But the atmosphere in the clinic was very festive; there were Valentine's presents being given out, and one of the patients made cookies!

Since it usually takes a couple of hours for the chemo to really set in, we stopped at the Goodwill on the way home.  I love second-hand stores, as I am sure most of you do!  I wish I could show you the lamp base and glasses I scored! (Soon!)  My husband found and pointed out the small pattern section to me, and wow did I hit the jackpot.

In addition to being a second-hand store junkie, I am also a Ren Faire junkie, and just this last year I finally made my own costume, so I have been on the lookout for this year's, and I found it in the discontinued Simplicity 8735, which was inspired by the movie Ever After, the costumes in which were in turn inspired by the drawings of Albrect Durer.


Simplicity 8735

The "Breathe" Dress, pattern A 
The dress I really want to do is Dress C, the one in the upper right-hand corner.  I fell in love with it immediately, although I guess it was the least popular, as I was not able to find any finished costumes representing it online. I've had a lot of fun looking online at Jacquards and Tapestries - I usually don't have a reason to!  By the way, if anyone knows a great and inexpensive place to buy those fabrics from, I'm open to suggestions...

We also found this Edith Head Vogue pattern from 1972, and I had to snatch it up, too:

Very Easy?  I'll be the judge of that!
I adore this pattern.  The dress is an absolute classic, and the kimono jacket is perfect, and it was a dollar.  How much better can you get?  I like the longer version, personally.

OK, I have been pining for this piece of furniture at Target for over 2 years now, and I was going to wait to show you all how it goes into my decor, and I still will, but I can't wait to show you!  This was my big Valentine's Day gift:

Art Deco!

Isn't it adorable?  The bedroom is decorated loosely in an Art Deco/French style, and this fits very nicely into that.  To be honest, I tried to find a place in the living room that it would fit so I could look at it all the time, but had to give in to where it wanted to live.  I can't wait to show you how it looks all accessorized and in its home!

It's just awesome to wait so long for something that you love, and to be totally satisfied!  After 2 years, we kind of got the clue that it was never going to go on sale, much like the Converse tank tops (I know Target, LOL).

The last thing I can tell you about without needing photos are my plans to open an Etsy shop!  I'm at the pricing/gathering supplies stage right now, so we are a ways off, but I'm totally excited about the products I have decided to make and sell.  I don't want to get into too many details, but it will be a mix of affordable beauty products and handmade goods, as well as a few gift baskets because I think gift baskets are the finest things, ever.  I'll have to do a post sometime about how much of a sucker I am for gift baskets - I even like the ones the grocery stores have (fruit and nuts).

Well, since Scrabble was such a hit last time, I thought I'd start winding up posts with a photo of her.  Take care, everyone, and talk to you soon!

Scrabble on the Patio

Friday, February 11, 2011

Sometimes, the Nest Gets Messy...

by Kimberlee


 ...and things get misplaced!  I have had several things to show you lately - progress on my dress, the first successful knitting, some new ideas for frame decals, a cute valentines project, a new pillow,  a furniture consultation...BUT I can't find the little cord that connects my camera card to my computer!

So either I've misplaced it or the cat mistook it for a toy tail and has hidey-holed it somewhere.  So I am sorry!

Until I find it, I'll entertain you with a picture the other love of my life, Scrabble:

Our little trickster, Scrabble
         

Friday, February 4, 2011

Because You're Sweet Enough Already

by Kimberlee

MY FIRST POSTED RECIPE!!!

My husband and I both have a sweet tooth, but we do watch our sugar intake.  I came into the marriage with a passionate avoidance to high fructose corn syrup/sugar and he was doing the low-carb lifestyle, both of which combined to create quite the Test Kitchen atmosphere when it came to making desserts! This recipe is adapted from a Nabisco recipe I found in a magazine.


Though, honestly, I didn't have as much of a sweet tooth until a couple of years ago when I started doing chemotherapy, and at that point sweet foods became much more appealing - not as much during the first chemo (I was a salt monster then, which is another problem entirely), but it definitely developed during my second and third courses.  Between the chemo drugs (steroids, mostly) and the sugar, I put on 20 lbs.  Not happy!

You would think weight gain would be the last thing a person battling a life-threatening disease should worry about, but I don't know many that don't.  It's difficult enough to feel attractive when you are ill, and when your body sort of betrays you, it becomes one thing over the line, so when Tom and I stopped with all the sugar and started with the Test Kitchen, I expected to lose weight, and I didn't!  Due to the drugs, I really can't lose it, but at least I am no longer gaining.

So now, when we do make treats, we make them in the lowest sugar-way possible.  I am aware that opinions are split on artificial sweeteners, but we swear by Splenda and its generic counterparts. (Note, when I use "splenda" I mean both, kind of like saying "kleenex" or "band-aid.") I haven't tried Stevia, but feel free to use it.

Now look at this beauty!

Chocolate Cheesecake Pudding Pie

Of course, not everything can be substituted.  I have yet to find low sugar vanilla wafers, and I think a little bit of dark chocolate is fine - a little goes a long way and it is high in anti-oxidants.

What You Need

2 (3.9 each) packages of instant pudding - no sugar chocolate
- note: I have NEVER noticed any taste difference between the name brand and generics, and I have eaten A LOT of pudding in my life
 Vanilla Wafers 
- Substitute Splenda or half & half sugar and splenda for this recipe
4 semi-sweet or dark chocolate squares
- you can also find these in no or reduces sugar
8 oz of whipped topping
- there are several options for this: look here, here and here (easiest)
1 package light cream cheese
2 cups cold fat free milk, plus 2 tablespoons for later
1/4 cup splenda

Line a 9" round pan with plastic wrap, and then line the vanilla wafers in the bottom and side as a crust.   We found that the side wafers stuck better if we used a little of the whipped cream as a "glue."

Melt 3 of the squares in a double boiler.

Beat the pudding mix and 2 cups of milk, then add the melted chocolate and 1 cup of the cool whip.  Pour into the round pan.

Refrigerate for several hours, then top with the rest of the whipping cream and shaved chocolate from the remaining square.


This pie is super-delicious, and if you don't tell the people you are serving it to that it is low-sugar, they will never know!